
Hidden water leaks are one of the most frustrating problems an old-house owner can face. A small leak behind a wall, under a kitchen sink, or inside a basement ceiling may go unnoticed for weeks. By the time you see a brown stain, peeling paint, or a musty smell, moisture may already have damaged nearby building materials.
Older homes can be especially challenging because their plumbing systems may contain aging galvanized steel pipes, copper lines, older drainpipes, outdated fittings, and shutoff valves that have not been operated for years. Previous repairs may also leave pipes hidden behind finished walls, ceilings, or built-in cabinets.
The good news is that you do not always need to open a wall to start investigating. A few careful checks can help you narrow down the likely source, decide whether the problem is urgent, and avoid unnecessary demolition. The key is to distinguish a pressurized water-supply leak from a drain leak, roof leak, or condensation problem before choosing a repair.
Quick Answer: How Do You Find a Hidden Water Leak?
Start by turning off faucets and water-using appliances, then check your water meter. If the meter continues to register water use when nothing should be running, you may have a leak in the supply system or an unnoticed water-consuming fixture.
Next, inspect visible plumbing, toilets, under-sink cabinets, basement ceilings, and the areas around showers and appliances. Look for damp materials, corrosion, mineral deposits, musty odors, and unexplained water stains.
If a leak is active, shut off the appropriate water supply valve if it is safe to reach. Call a licensed plumber when the source is inside a wall or ceiling, the pipe is severely corroded, the leak cannot be isolated, or water is damaging electrical components. Finding the source before repairing the visible damage is essential.
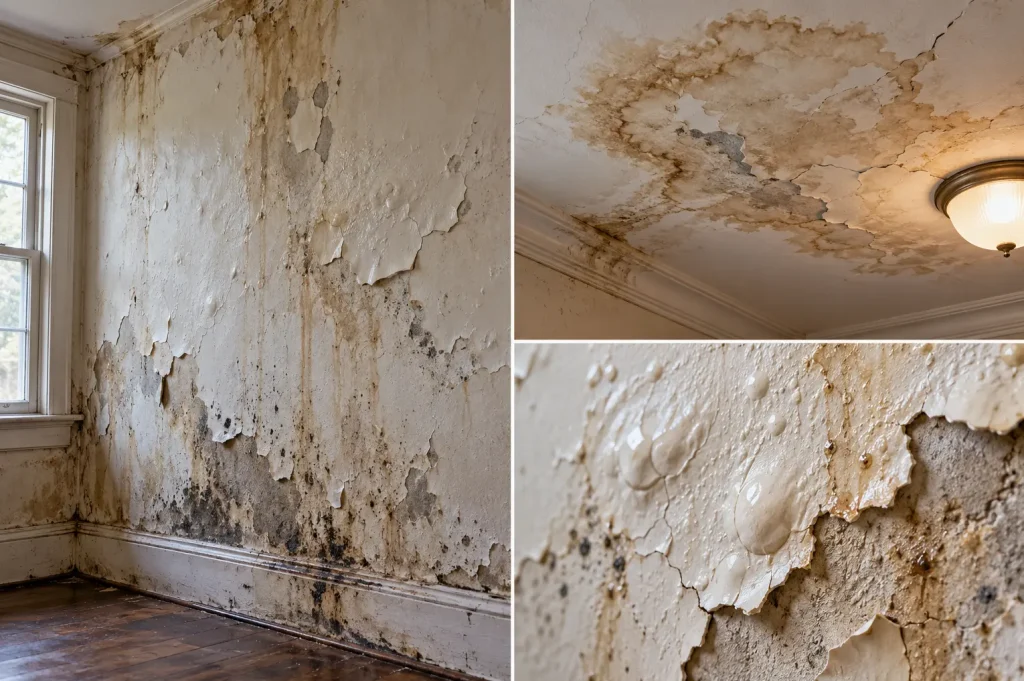
1. Recognize the Warning Signs of a Hidden Water Leak
A hidden leak does not always produce a puddle. In many older homes, the first clue is a change in the building materials or an unexplained increase in water use.
- Brown or yellow stains: Discoloration on ceilings and walls may indicate moisture from a leaking pipe, a bathroom above, or a roof problem.
- Peeling or bubbling paint: Paint and plaster may lift when moisture repeatedly reaches the surface.
- Soft or swollen materials: Wood trim, flooring, cabinet bottoms, and drywall may swell, warp, or feel unusually soft.
- Persistent musty odors: A damp smell inside a cabinet, basement, or wall cavity deserves investigation, especially when it persists after ventilation.
- Unexpected water-meter movement: Water use when all expected fixtures are off can point to a supply leak or a fixture that is still consuming water.
- Reduced water pressure: A partially blocked or deteriorating pipe can reduce flow, although pressure problems can have several causes and do not prove a leak by themselves.
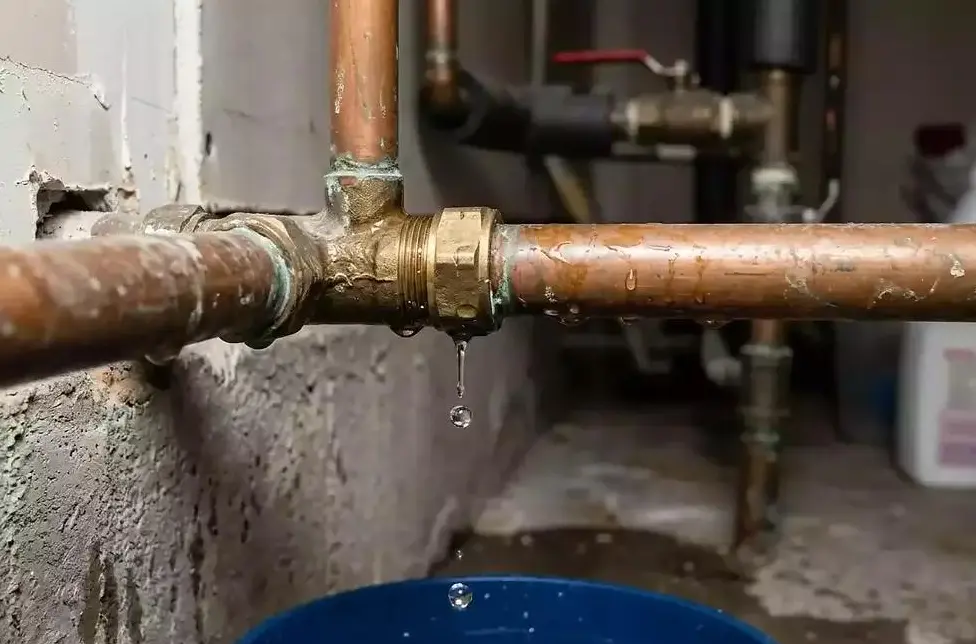
- Corrosion or mineral deposits: Greenish deposits on some copper fittings, rust on galvanized steel, or white mineral buildup around a joint may indicate a history of moisture or leakage.
One warning sign alone does not identify the source. For example, a ceiling stain directly below a bathroom could come from a supply pipe, a drain connection, a failed shower seal, or water escaping around the tub. Follow the moisture pattern and test likely sources instead of assuming that the nearest pipe is responsible.
2. Check the Water Meter Before Opening a Wall
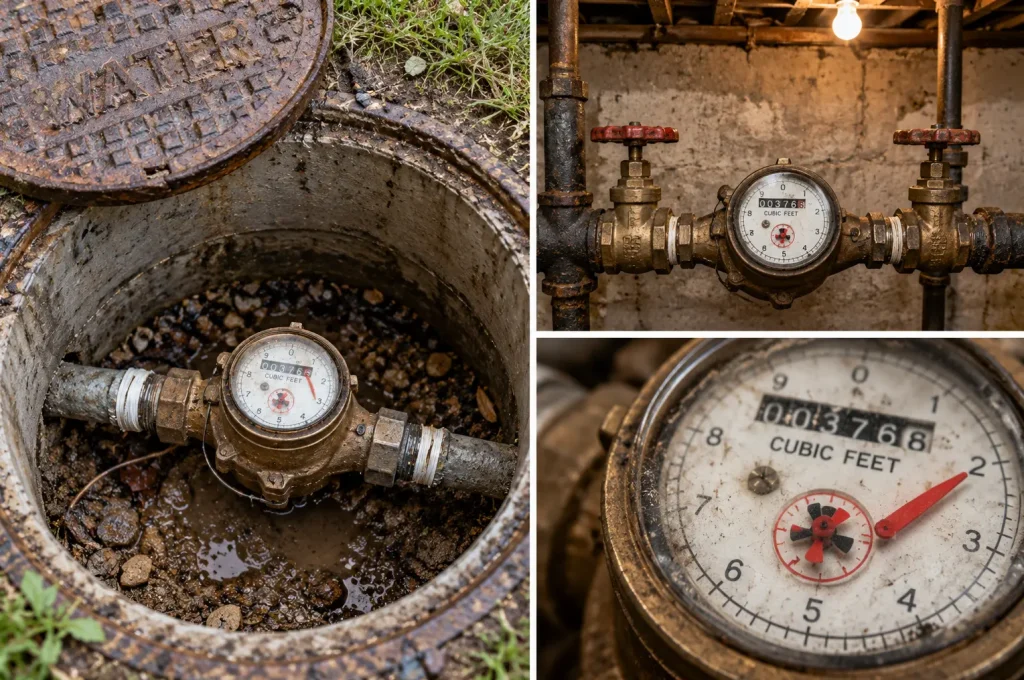
A water-meter test is a useful first step because it can help determine whether water is moving through the supply system when your household should not be using any.
Step 1: Stop Normal Water Use
Turn off faucets and showers. Make sure the washing machine, dishwasher, and other water-using appliances are not running. If your home has an automatic ice maker, irrigation system, humidifier, or similar equipment, account for it as well. Otherwise, normal automatic water use may confuse the test.
Step 2: Record the Meter Reading
Check the meter’s digital display, dial, or low-flow indicator, depending on the model. Take a photo or write down the reading so you can compare it later.
Step 3: Wait and Check Again
Leave the water unused for about 15 to 30 minutes, then check the meter again. If the reading changes or the leak indicator continues moving, investigate further. A very slow or intermittent leak may require a longer observation period, and a short test cannot rule out every hidden leak.
Step 4: Use the Main Shutoff to Narrow the Location
If you see unexplained water use, close the home’s main water shutoff valve if it is accessible and safe to operate, then observe the meter again. If movement stops, the leak may be downstream of the valve. If movement continues, the issue may be in the service line between the meter and the house, another connected line, or a valve that is not sealing completely.
This test is not a definitive diagnosis. Do not force a stuck or badly corroded valve, and do not tamper with utility-owned equipment. If the result is unclear, ask a plumber or your water utility to help determine the next step.
3. Inspect the Most Likely Leak Locations
Once you have checked the meter, inspect accessible areas systematically. Start with places where plumbing connections are common or where stains and odors have appeared.
Under Kitchen and Bathroom Sinks
Remove cleaning supplies and stored items from the cabinet. Use a flashlight to inspect the shutoff valves, supply hoses, faucet connections, drain trap, and the cabinet floor. Look for droplets, swollen wood, rust, and mineral deposits.
Dry the area first if it is safe to do so, then run the faucet and watch the connections. Supply leaks may appear while the faucet is pressurized. Drain leaks may occur only while water is flowing through the drain, so check the two systems separately.
Around Toilets
Look for water around the toilet base, supply connection, shutoff valve, and tank. A toilet can also waste water silently if its flapper or fill valve does not seal properly.
One simple check is to add a few drops of food coloring to the toilet tank without flushing. If color appears in the bowl before you flush, water is likely passing from the tank into the bowl. This identifies a common source of unexplained water use, but it does not diagnose leaks in concealed supply pipes or the floor beneath the toilet.
Basements and Crawl Spaces
In homes with accessible basements or crawl spaces, inspect exposed pipe runs, joints, supports, and the undersides of floors. Pay particular attention to places where pipes pass through framing or connect to older plumbing materials.
Rust flakes, fresh moisture, green or white deposits, and damp insulation can help narrow the search. However, not every wet basement indicates a plumbing leak. Rainwater, groundwater, foundation seepage, and condensation may create similar symptoms.
Walls, Ceilings, and Floors
Map the stain rather than immediately cutting into the surface. Note which fixtures, bathrooms, or pipes are located above or nearby. Check whether the mark grows after someone showers, flushes a toilet, runs the dishwasher, or uses a particular sink.
Do not assume water travels straight down from the leak. It can follow a pipe, joist, or other building material and emerge several feet away from the original problem.
4. Determine Whether the Leak Comes from a Supply Pipe or a Drain
Distinguishing the type of leak can save time because the two systems behave differently.
| Clue | Possible Cause | Useful Next Check |
|---|---|---|
| Water meter moves when expected water use is off | Supply-side leak or a fixture using water unexpectedly | Check toilets and appliances, then isolate the main supply if safe |
| Moisture appears when a faucet is running | Supply connection or drain assembly | Observe the supply lines first, then test the drain while water flows |
| Leak appears after a shower or bath | Shower plumbing, drain, grout or sealant failure, or water escaping around the enclosure | Have the shower and drain tested separately |
| Ceiling stain grows after a toilet flush | Toilet seal, drain connection, or supply component | Stop using the fixture if the leak is active and arrange an inspection |
| Basement dampness increases after heavy rain | Foundation seepage, poor drainage, roof runoff, or a plumbing leak | Compare the timing with rainfall and check plumbing independently |
| Water appears on cold pipes in humid weather | Condensation rather than a pipe leak | Check whether moisture forms across the pipe surface instead of at a joint |
These clues are useful for narrowing down the possibilities, but they are not conclusive by themselves. A professional may need to perform pressure tests, drain tests, or specialized leak detection to confirm the source without unnecessary demolition.
5. How to Fix a Hidden Water Leak
The right repair depends on the pipe material, leak location, severity of corrosion, and whether the damaged section is accessible. A repair that works for a modern plastic fitting may be inappropriate for a fragile, heavily corroded pipe in an older house.
For a Small Leak at an Accessible Connection
If the source is clearly identified and the fitting is in good condition, a plumber may be able to replace a washer, supply hose, valve, or fitting. After the repair, the connection should be tested under normal operating conditions and checked again for moisture.
Do not keep tightening an old valve or fitting simply because it is wet. Excessive force can damage brittle parts, strip threads, or turn a slow leak into a more serious one.
For a Corroded or Deteriorating Pipe
Older homes may have galvanized steel supply pipes that have corroded internally or become restricted by mineral and rust buildup. If a section is leaking, the surrounding pipe may also be deteriorated. Replacing only the visible failure may not address the broader condition of the system.
A qualified plumber can evaluate the affected section, compatible replacement materials, existing connections, and whether a larger repiping project is more practical. The decision should be based on inspection rather than the age of the home alone.
For a Leak Behind a Wall or Ceiling
First, locate and isolate the water source. A plumber may use moisture meters, thermal imaging as a screening tool, acoustic equipment, or other methods to narrow the search. These tools help guide the investigation but do not guarantee that every leak can be located without opening a surface.
Once the pipe is repaired, the affected area needs time to dry. Wet insulation, damaged drywall, and deteriorated wood may require further assessment or replacement. Painting over a stain before the underlying leak and moisture are resolved is not a lasting repair.
For a Drainpipe Leak
Drain leaks often appear only when a fixture discharges water. The appropriate repair may involve replacing a damaged trap, seal, fitting, or pipe section. If the drain is concealed or made from deteriorating material, have the full affected section assessed rather than covering the leak with tape or surface sealant.
For related pipe maintenance and repair topics, place your relevant category link here: 【在这里加入Plumbing分类页的相关分类页内链】
6. DIY or Hire a Plumber? Compare Your Options
Not every leak requires the same level of professional work. Use the table below to decide what is reasonable to investigate yourself and when specialist help is the safer option.
| Approach | Relative Cost | Installation or Repair | Maintenance | Advantages | Limitations |
|---|---|---|---|---|---|
| DIY visual inspection and meter check | Low | No installation required | Repeat checks when warning signs appear | Quick, inexpensive, and useful for narrowing down the source | Cannot confirm every concealed or intermittent leak |
| Replace an accessible hose or simple fixture component | Low to moderate | Depends on access, condition, and skill | Check connections for moisture after use | May resolve a straightforward, clearly identified problem | Old shutoff valves and corroded fittings may break during work |
| Professional leak detection | Moderate to high | Specialist inspection and testing | Repair the confirmed source and monitor the area | Can narrow down concealed leak locations and reduce unnecessary opening | Testing may not identify the exact failure immediately |
| Open a wall or ceiling and repair a concealed pipe | Moderate to high | Plumbing repair plus access and finish restoration | Check for residual moisture and damaged materials | Allows direct access to the damaged section | May involve drywall, plaster, insulation, painting, and additional repairs |
| Partial or whole-house repiping | High | Requires planning, plumbing labor, and possible permit coordination | Inspect accessible connections and maintain fixtures | May address widespread deterioration instead of repeated isolated failures | Higher upfront cost and significant disruption in some homes |
These are relative cost levels, not fixed U.S. price quotes. Actual costs depend on your region, labor rates, pipe materials, accessibility, permits, water damage, and the amount of wall or ceiling restoration required. Get a written, itemized estimate before authorizing a major repair.
7. Practical Scenarios: What Should You Do?
Scenario A: The Water Bill Is Higher, but You Cannot Find a Wet Spot
Start with the water meter and toilet dye test. Check irrigation equipment, appliance connections, and accessible supply lines. A leak under a slab or in a buried service line may not create an obvious indoor stain, so arrange professional help if unexplained water use continues.
Scenario B: A Brown Ceiling Stain Appears Below the Upstairs Bathroom
Stop using the suspected fixtures if the stain is actively growing or dripping. A plumber may need to test the supply and drain connections, while the shower enclosure or toilet seal may also need inspection. Do not repaint the ceiling until the cause has been identified and the materials have dried sufficiently.
Scenario C: An Old Basement Pipe Has Rust and a Small Drip
Protect the area from water damage and use an appropriate shutoff valve only if it operates safely. If the pipe is deeply corroded, avoid scraping, bending, or tightening it. Ask a plumber to assess whether the damaged section can be repaired safely or whether nearby piping should also be replaced.
Scenario D: The Wall Is Damp but the Water Meter Does Not Move
A stationary meter does not rule out every source of moisture. The issue could be an intermittent supply leak, a drain leak that occurs only during use, condensation, a roof leak, or water entering through the foundation. Compare the timing of the dampness with showers, appliance use, and rainfall.
8. When Is a Hidden Water Leak an Emergency?
Take action promptly when water is actively spreading, a ceiling is sagging, flooring is becoming unstable, or the leak is close to electrical equipment. Do not touch electrical panels, outlets, or appliances while standing in water or when the surrounding area is wet. If the area is unsafe, keep clear and contact the appropriate emergency professional.
- Active or rapidly growing leak: Close a safe, accessible water shutoff and contact a plumber.
- Water near electrical equipment: Keep away from the affected area and seek qualified emergency assistance.
- Bulging ceiling or visibly weakened structure: Keep people away from the area below and arrange urgent assessment.
- Persistent dampness or suspected mold: Stop the moisture source and assess the extent of the damage. Extensive contamination or moisture inside building cavities may require a qualified remediation professional.
In older homes, be cautious before cutting walls or removing insulation. Older paint, plaster, and insulation may contain hazardous materials. If the building materials are of uncertain composition, seek appropriate assessment before disturbing them.
9. Frequently Asked Questions
How can I tell if a water pipe is leaking behind a wall?
Look for unexplained water stains, peeling paint, damp drywall, musty odors, or changes in water use. Check the water meter with expected water use turned off, then investigate nearby fixtures and pipes. These signs can narrow down the likely location, but a professional inspection may be necessary to confirm a concealed leak.
Can a hidden water leak occur without increasing my water bill?
Yes. A leak may be intermittent, very small, or connected to a drain rather than the pressurized supply system. Some leaks also come from rainwater or groundwater, which will not register on the home’s water meter. A normal meter reading cannot rule out every moisture problem.
Can I fix a hidden water leak without opening the wall?
Sometimes. If testing identifies an accessible valve, hose, or connection, the repair may be possible without opening a wall. For a leak inside a wall or ceiling, the source usually needs to be reached and repaired. Leak-detection equipment may reduce unnecessary demolition, but it cannot guarantee a repair without opening the surface.
How much does it cost to find and repair a hidden water leak?
Costs vary widely depending on the location, pipe material, detection method, local labor rates, and whether wall or ceiling repairs are necessary. An accessible fitting may be relatively inexpensive to repair, while a concealed pipe failure, slab leak, or larger repiping project can cost substantially more. Ask for separate estimates for detection, plumbing repair, and restoration when possible.
Should I replace all the plumbing in an old house if one pipe leaks?
Not necessarily. One leak does not prove that the entire system needs replacement. However, widespread corrosion, repeated leaks, restricted flow, and deteriorated galvanized pipes may indicate a larger problem. Have a plumber evaluate the overall condition and compare the cost and disruption of a targeted repair with partial or whole-house repiping.
Conclusion
Finding a hidden water leak in an old house begins with careful observation, a water-meter check, and a systematic inspection of likely trouble spots. The most important step is to identify the actual source before repairing stains or damaged finishes.
Simple problems at accessible fixtures may be manageable, but corroded pipes, concealed leaks, active water damage, and electrical hazards call for professional help. In older homes, the condition of nearby plumbing matters just as much as the visible leak. A careful diagnosis can help you choose a lasting repair, limit unnecessary demolition, and protect the rest of the house from further moisture damage.